
 Plymouth: The First Decade
Windshield Wiper Motor Tune-up
Background
The windshield wiper motor is driven from the manifold vacuum. The owner's manual suggests a yearly maintenance procedure of removal and putting a few drops of "refrigerator oil" into it.
I have seen three failure mode in these devices:
- Bad castings. The bodies are die cast using a relatively inexpensive alloy. Over time the casting may bubble, crack or deform. Fortunately, this appears to be a relatively rare failure mode. As best I can tell, such a wiper is fit for nothing but the junk heap.
- Dried out lubricant.
- Leather flapper arm seal dried out. Note: Some units I have seen have a fabric material rather than leather for the flapper arm seal. On these units the following treatment will not be as successful. But, not knowing the internals of your particular wiper motor, this procedure is still worth a try. If nothing else it could soften and loosen old congealed grease that may be causing problems.
If you attempt to disassemble the unit you will almost certainly destroy the gasket between the cover and the body. The air passage ways between the pieces are small enough and intricate enough that a home made gasket is very difficult to reproduce at home. If you remove the cover you are almost certainly in the market for a rebuild kit, even if you did not need one before you started.
The Tune-up Part 1
The October 1979 issue of Skinned Knuckles credits this method for lubricating a Trico vacuum wiper to original service documents (note the term “cleaner” is used to refer to the wiper):
When the Trico Automatic Cleaners need oil, the quantity required is really very small. The right kind of oil puts new life into the packings and has a generally beneficial effect on cleaner action.
TO OIL —
- Remove the hose connection from the cleaner
- Place in any small receptacle (use oil can top) 1 or 2 teaspoonful of Trico Maro Oil, or any light oil if Maro Oil is not available.
- Use a 4 or 5 inch length of rubber hose. Don’t use the hose from the cleaner – oil softens rubber.
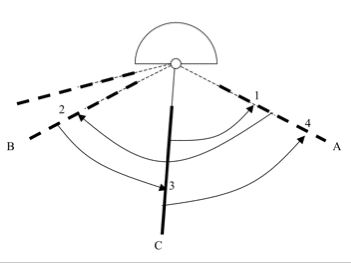
- Turn the shaft in the cleaner – by the handle if it is an interior type or by the wiper bar if it is the exterior type – to the extreme right – Position 1. (See illustration.)
- Move back about 3/4 of the normal travel to the left (Position 2) being careful not to move it all the way. If you miss the 3/4 stop, start over again.
- Submerge the end of the 5 inch hose in the oil, then make a quick move half way to the right (Position 3).
- Withdraw the hose from the oil. Complete the balance of the stroke to the right (Position 4). This operation will result in oil being drawn into one side of the motor.
- Repeat the foregoing, starting off in the opposite direction, with complete motion to the left; return stroke 3/4 of the say to the right; submerge hose in oil; quick half stroke to the left; withdraw the hose from the oil; and complete movement to the left.
Caution — Do not use old or dirty hose as particles may be drawn into the motor.
The Tune-up Part 2
If the above normal lubrication procedure does not bring the wiper to life, try a little more aggressive lubrication:
- Remove wiper motor from car.
- Remove rear snap on cover. This cover is over a spring loaded vacuum valve that directs manifold vacuum to one side or the other of the leather sealed flapper inside the wiper body. The action of this valve creates the reciprocating (back and forth) motion of the wiper blade.
- Clean and re-lubricate valve assembly. I used white spray grease on the metal valve piece and motor oil on the felt stop.
- Replace rear snap on cover.
- Remove on/off control valve. This manually operated sliding valve directs manifold vacuum to one side of the flapper in the off position to park the wiper blade. In the on position it directs the manifold vacuum to the reciprocating valve mechanism. This is held in place by two screws. There is a flat spring under it and a metal valve piece under the spring. Place them somewhere where they will be safe for a few days.
- Using a small diameter nail or the wiper arm itself, rotate the motor until it is about half way through its stroke. You are moving the flapper arm inside to its lowest position. Using the nozzle that comes with it, fill the wiper body a light weight spray oil. I used WD-40. You fill the body through a hole exposed when the on/off control valve is removed.
- Prop the wiper motor so that the output shaft is on the top and
the curved body is down. (This is upside down to how the motor
mounts in the car.) Leave it sit for several days. Occasionally put
some more spray oil in it to assure it is full. You are soaking the
leather piece inside and it will take a while.
Note: Many wiper motors are fitted with synthetic material rather than leather. If this is true on yours then soaking with oil will not help. On the other hand you won’t know what material is in your motor until you open it up to install a rebuild kit. So this step won’t really hurt anything and may help.
- After several days of soaking, work the output shaft back and forth to expel the excess oil.
- Reassemble the on/off valve.
- Install the wiper motor in the car.
This may not get your wiper running again, but the cost is much lower than a rebuild unit or a repair kit. So try it first. If it does not work then go for the more expensive repair.